HOME BLOG

Yinkos Tutorial Blog is launched

Posted on: November 10th, 2024 by Olu No Comments

Hi folks,

We will like to announce with great pleasure that the Yinkos Tutorial Blog is now launched.

Why have we launched the Yinkos Tutorial Blog? We launched it to provide a platform where we can publish educational articles from time to time to help students with the various subjects we tutor.

The blog is located at https://tutorial.yinkos.com/blog/.

You can access the blog by clicking Blog on the main menu of the Yinkos Tutorial website.

That’s all for now. Till next time, happy learning.

How to disable a test class or method in Java

Posted on: April 26th, 2024 by Olu No Comments

Hi folks,

In this brief post, we will talk about how to disable a test class or method in a Java-based project. Why would you want to do this? It could be because the test isn’t yet fully implemented. Another situation is if you have Continuous Integration in place where tests are run automatically during a build, but a certain test class isn’t yet ready for automatic execution.

To disable a test class or method, you can use the Disabled annotation from JUnit. E.g.

import org.junit.jupiter.api.Disabled
...

@Disabled
class YourTestClass {
...
}

That’s it. Now such a test would be ignored. That’s all for now. Till next time, happy software development.


References

Disabled (JUnit 5.0.0-M2 API). https://junit.org/junit5/docs/5.0.0-M2/api/org/junit/jupiter/api/Disabled.html

Yinkos Tutorial is launched

Posted on: February 28th, 2024 by Olu No Comments

Hi folks,

It’s with great pleasure that we announce the launch of our new service called Yinkos Tutorial.

Yinkos Tutorial provides students with quality one-on-one tutoring in a variety of subjects at secondary school level and beyond, including:

  • Math
  • Physics
  • English
  • Piano
  • Computer Programming

To access the Yinkos Tutorial website, click here.

If you would like tutoring from our expert tutors in any of the aforementioned subjects, click here to register with Yinkos Tutorial right away.

If you have any questions or comments, feel free to contact us.

How to generate hashtag symbol on a keyboard

Posted on: February 16th, 2024 by Olu No Comments

Hi folks,

in this post I go over a few ways to generate the hashtag symbol (#) on your keyboard.

On a Macintosh, the way to do this is to press Alt + 3.

If you find yourself working on a Windows virtual machine where that combination doesn’t work, alternate way to generate # is by using a combination of Alt and the 3 and 5 keys from your numeric keypad, i.e. you press and old Alt, then type 35 on the numeric keypad, then release Alt.

That’s all for now. Till next time happy computing.

References

How do you make a hashtag sign on a keyboard? – Quora

How to fix the issue where messages sent to email alias of Group doesn’t appear in inbox

Posted on: February 15th, 2024 by Olu No Comments

Hi folks,

In this post I will discuss how to fix an issue one may face when using multiple email address managed by Google Workspace. Specifically we’ll talk about how to fix the issue where messages sent to your email alias or to a Group you belong to does not appear in your Gmail inbox.

Example: John’s primary email address is john@solarmora.com. He also has the email alias salesman@solarmora.com. If John includes salesman@solarmora.com as a recipient of a message, the message isn’t sent to his inbox. However, if John sends a message to his primary account, john@solarmora.com, the message is sent to his inbox.

The cause of this problem is that Gmail, in an effort to prevent clutter, doesn’t deliver messages that you send to your own alias (or group you belong to) to your inbox.
You can find them in Sent Mail or All Mail. To receive these messages in your inbox, you need to set up the alias or Group as an alternate “Send mail as” address.

That’s all for now. Till next time, happy emailing.

References

Send emails from a different address or alias – Gmail Help.

Messages sent to email alias or Group aren’t in my inbox – Google Workspace Admin Help.

How to Grant Yinkos Hymns Manager the Microphone Permission on Safari

Posted on: September 4th, 2023 by Olu No Comments

Hi folks,

In this post, we cover how to grant the Microphone permission to Yinkos Hymns Manager (YHM) on iOS devices e.g. the iPhone. In order to record live songs with the Yinkso Hymns Manager on an iOS device, it is necessary to grant the website the Microphone permission.

If you find that you’re unable to use YHM to record live audio on the iPhone, then it could be because the Yinkos Hymns Manager website hasn’t been granted the Microphone permission. To grant this permission, follow these steps.


Open https://hymns-manager.yinkos.com in Safari.

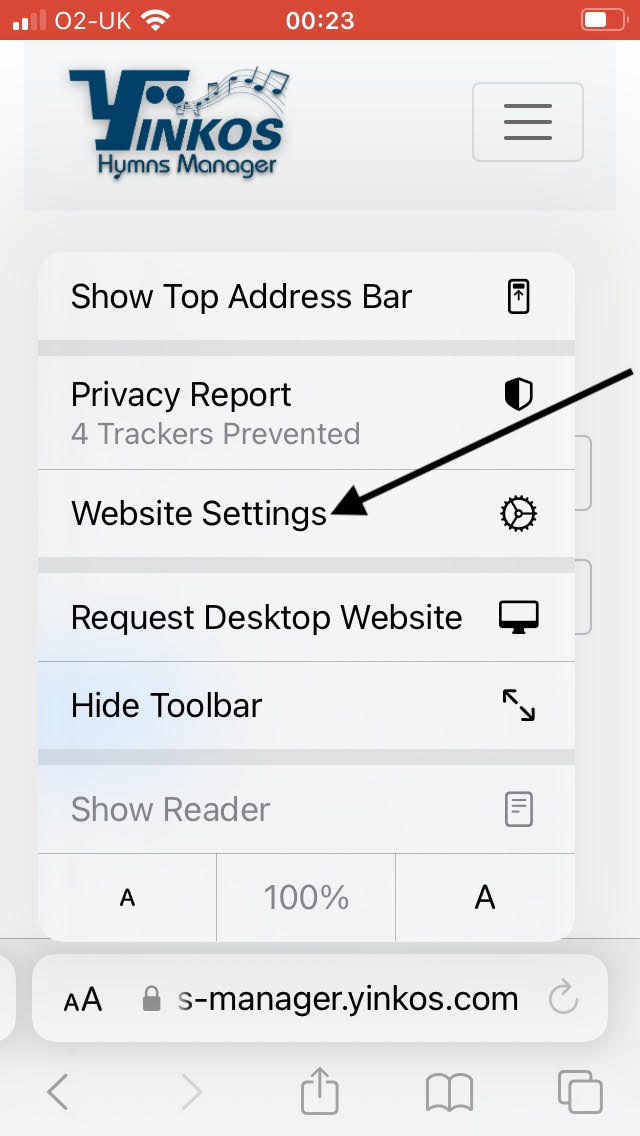
Click on AA button on bottom left of browser tab.


Click on Website Settings.


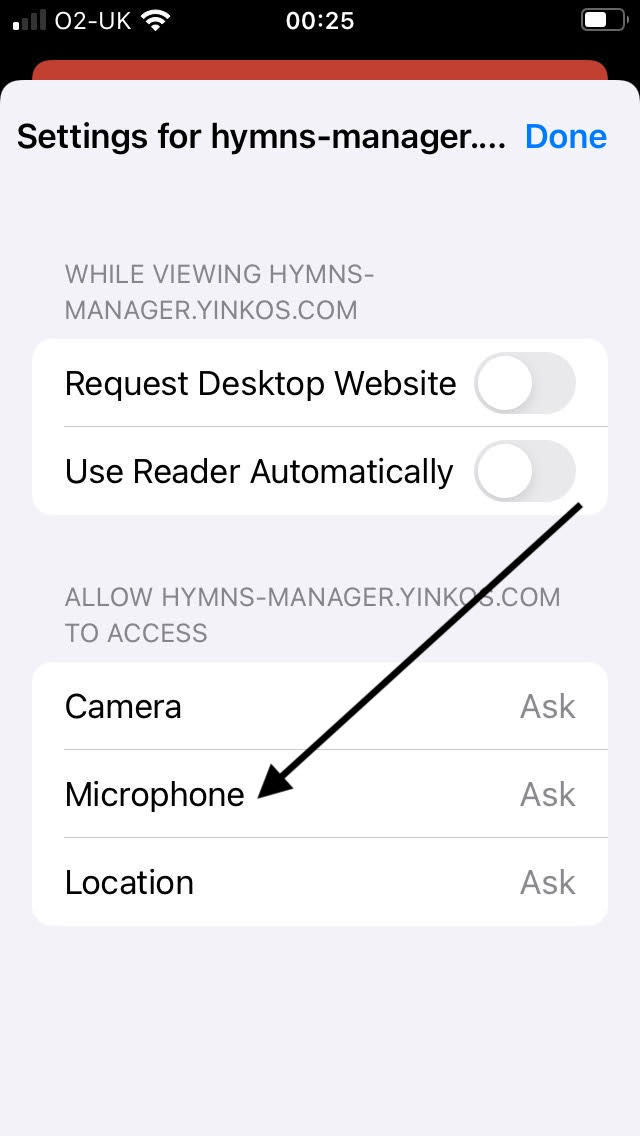
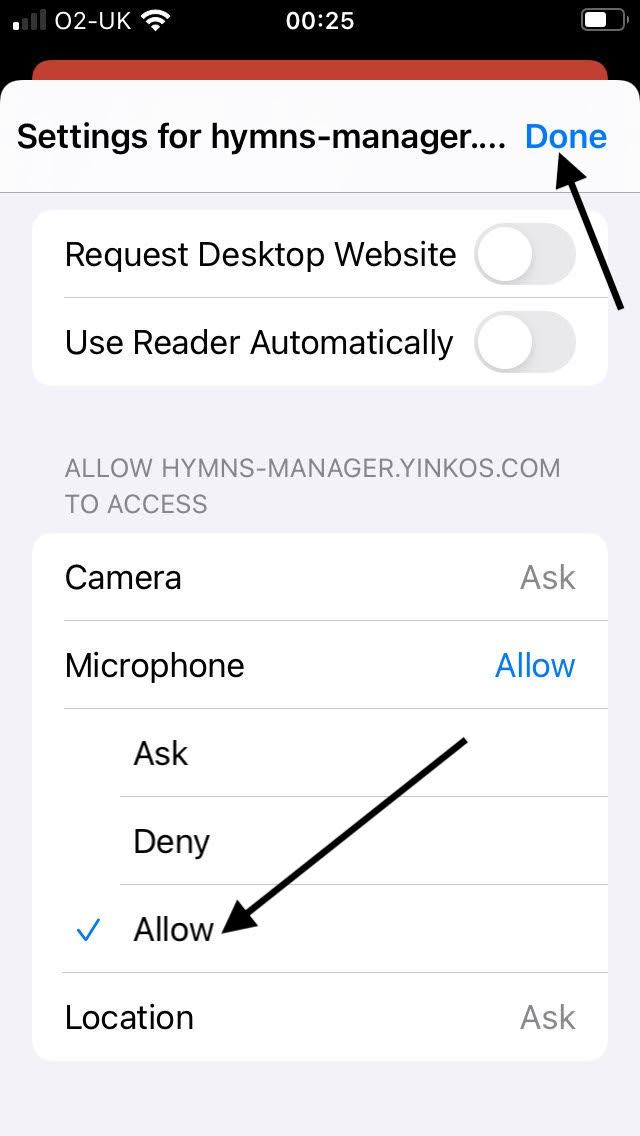
Under Microphone, check if the text to the right says Allow. If not, click on Microphone, then click Allow. Then click on Done.


Now you can return to the app. you should be able to record songs live henceforth.

That’s all for now. Till next time, happy hymns management.

How to add entitlements to your libGDX iOS game

Posted on: August 23rd, 2023 by Olu No Comments

Hi folks,

In this post, we will go over how to add an entitlement (capability) to your libGDX iOS game. we assume the app uses robovm to provide the iOS support.

We will assume you want to add Game Center capability to your app.

First, open xcode for a sample project, optionally with the same bundle identifier as your game app

Add the Game Center capability within Xcode by following the instruction here.

Check your provisioning profile to make sure it has the Game Center entitlement

Verify that you can build your sample iOS app using your distribution provisioning profile

If you get an error that the provisioning profile doesn’t contain the Game Centre entitlement, then go to apple developer portal and check the profile there

If the profile has expiration field set to invalid, that means the profile is out of date. click edit button to see the profile details page, then click save. check the profile again to make sure it has a valid expiry date (in the future).

Close and re-open xcode and make sure it fetches the latest provisioning profile

Then check for the entitlements file within your Xcode project. it will be a file with file name ending with .entitlements

Copy the entitlements file into your libgdx ios project. you can call it something like Entitlements.plist.xml

Next you need to configure robovm to add that entitlement. to do this, open your robovm config file (ios/robovm.xml) file and add the following line within the config tag.

<iosEntitlementsPList>Entitlements.plist.xml</iosEntitlementsPList>

That’s it. you can now build your iOS app with robovm resting assured that it has the desired capability.

That’s all for now. Till next time, happy game development.


References

Configuration Reference · RoboVM User Guide. http://robovm.mobidevelop.com/docs/en/configuration.html.

How to manage hymn records with Yinkos Hymns Manager

Posted on: August 17th, 2023 by Olu No Comments

Hi folks,

In this article, we will cover how you can use Yinkos Hymns Manager (YHM) to manage record of hymns selected for your church services on specific dates.

In YHM, we call these Hymn Records. The advantages of using YHM to store hymn records are

1. Ease of use – is that it’s very easy to view all hymn records
2. Search – it’s very to search for particular hymn numbers and know what dates that hymn was selected


How to view all Hymn Records

Once logged in to YHM, you can access Hymn Records by clicking on Hymn Records on the home screen.

Alternatively, you can click on Hymns Management > Records on the top menu.


You will see a list of all hymn records grouped by date.

For each date, you will see all the hymn numbers chosen, including the position and hymn number (Hymn).

You can edit a hymn record by clicking the Edit icon.

To delete a hymn record, click the Delete icon. A confirmation dialog will be displayed.

If there is an audio recording for that hymn available, the Listen button will be active

You can click on the Listen button to view an audio player dialog and play the hymn. This can be useful when practicing songs.

If there is no audio recording, then the Listen button would be disabled.


Adding a new Hymn Record

You can add a new hymn record by clicking the Add button.

you can then fill out the details on the Hymn Record detail screen and click Save.

You can also create or update hymn records through the suggestions screen. Click here to find out how to use Hymn Suggestions.


How to search for hymn records

To search for a hymn record, enter the hymn number in the search bar and click the search button or press Enter.

You will see results showing all dates the hymn was chosen and the position it was chosen for.

To show all records, removing any search criteria, click Show all records

In this article we have covered how to manage hymn records using YHM, including how to create records, search for records, edit and delete records and listen to audio recordings of your hymns. Hope this has been helpful. Till next time, happy hymns management.

How to suggest hymns using Yinkos Hymns Manager

Posted on: August 16th, 2023 by Olu No Comments

Hi folks,

In this article we will cover how to suggest hymns with YHM (Yinkos Hymns Manager).

First you visit the Suggestions screen. You can do this by clicking Suggest Hymns from the home screen.


Alternatively, from the top menu, click Hymns Management > Suggestions.


On the Hymns Suggestions page, you can suggest hymns for a given date by setting the selection mode and target date, then clicking Suggest.

Selection Mode means the approach you want to use to suggest hymns. There are 3 selection modes available:

1. Random
2. From Previous Selections
3. From Suggestions File.

We will explore these modes.

Random – suggest hymns randomly from certain sections of the Celestial Church of Christ hymn book. You can customise the sections by setting the Hymn Config in the Settings screen. You can see the sections being used by clicking on the Hymn Sections accordion in the page. YHM makes sure you don’t repeat hymns too often.

From Previous Selections – suggest hymns based on songs you have selected in the past. This can be very useful if you want to make sure you choose hymns that are familiar to your choir. In this mode, YHM would usually suggest hymns that were picked in a certain time range before the target date. By default this is between 63 and 120 days  before the target date. You can customize the time range on the Settings screen under the section: Time range for suggesting from Previous Hymns

From Suggestions File – suggest hymns based on songs from a Suggestions file you have uploaded to app Settings. This is useful if your choir has a list of hymns they are familiar with and would like to pick their hymns from that list. Click here to find out how to set up a suggestions file.

Note: if a hymn recording is available for a suggested hymn, then the suggestion is displayed in green font, otherwise it is displayed in black font.

For each suggestion, we display the section of the Celestial Church hymn book that the hymn belongs.

For each suggestion, we display a Save button. If you want to save the suggestion as a hymn record, all you have to do is click Save.

Also, if a hymn has already been selected and stored for a given position on a given date, then we display the stored hymn number along side the suggestion.


That’s all for now. Till next time, happy hymns management.

How to use Yinkos Hymns Manager to suggest hymns from a preferred list of hymn numbers

Posted on: August 15th, 2023 by Olu No Comments

Hi folks,

In this article we talk about how to use Yinkos Hymns Manager (YHM) to suggest hymns from a known list of hymn numbers. Your choir may have a list of hymns they know well and would like to choose from for future services. You can use YHM to easily choose from this list by following these steps.

First, create a Suggestions File containing the preferred list of hymns. A suggestions file is a csv file with a single column hymn. Under that column you list the hymn numbers. E.g.

hymn
636
618
616
603

Next, launch the YHM app, log in, and go to the Settings screen by clicking Settings in the top menu.


On the Settings screen, under Hymn Suggestions File, click on Add Suggestions File. If you have already uploaded a suggestions file in the past, then you should click Update Suggestions File.


On the Add/Update Hymns Suggestions File, choose the file and click Save.

That’s it. You have set up YHM to suggest hymns from your preferred hymn numbers.

To use these suggestions, go to the Suggestions screen, set the target date, and importantly, set the Selection Mode to From Suggestions File.

That’s all for now. Till next time, happy hymns management.